Step-by-Step Guide to Fixing a Leaking Toilet Water Valve and Preventing Future Issues
A leaking toilet water valve can cause unnecessary water waste, higher bills, and frustrating sounds. Fortunately, replacing a faulty valve is a manageable DIY task for most homeowners. This guide will walk you through every step needed to replace a toilet water valve, helping you restore functionality and save water.
1. Introduction
The toilet water valve is key to managing the water flow into your toilet tank. When it malfunctions, you may notice persistent leaks, a continuously running toilet, or water pooling around the base. Replacing a leaking or faulty valve can prevent water waste and avoid plumbing complications down the line.
2. Understanding the Toilet Water Valve
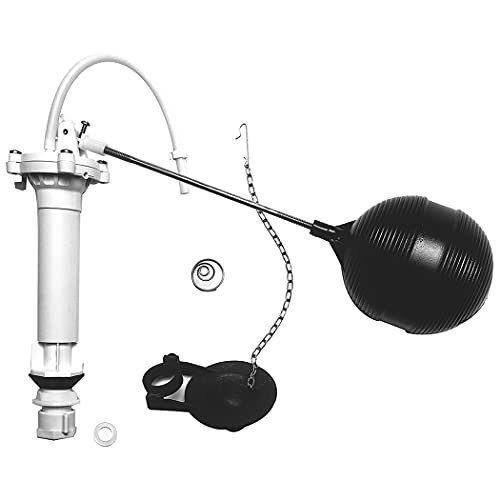
The toilet water valve regulates the flow of water to refill the toilet tank after each flush. There are different types:
• Ballcock valves: Often found in older toilets and use a float ball to control water flow.
• Fill valves: More common in modern toilets, these are efficient, compact, and easier to replace.
Knowing which type of valve your toilet uses will help ensure you purchase the right replacement part. Explore on Amazon and Home Depot
|
Universal Fit Design
|
Ultra-Quiet Operation

|
|
Our Rating:
4.4
|
Our Rating:
4.5
|
|
$33.81
|
$26.59
|
3. Tools and Materials Needed
Gather the necessary tools and materials before you start to make the replacement process smooth and efficient. Tools:
• Adjustable wrench
• Bucket
• Towel
Materials:
• New toilet water valve
• Plumber’s tape
• Steel-braided supply hose (if replacing an old plastic one)
4. Safety Precautions
It’s essential to take a few safety precautions before you start:
• Turn off the water supply: Locate the shutoff valve near the base of the toilet and turn it clockwise to close it.
• Tip: If the shutoff valve is old or difficult to turn, it may be a good idea to replace it while you’re at it to ensure easier future maintenance.
5. Step-by-Step Guide to Replacing the Toilet Water Valve
Follow these detailed steps to replace the valve without complications:
Step 1: Turn Off the Water Supply
Locate the water supply valve near the base of your toilet and turn it clockwise until it’s fully closed.
Step 2: Flush the Toilet
Flush the toilet to empty most of the water from the tank. If there’s still water at the bottom, use a small container—like a paper coffee cup or plastic lid—to scoop out the remaining water. This prevents any spills or leaks when you remove the old fill valve.
Step 3: Disconnect the Water Supply Line
Use an adjustable wrench to carefully disconnect the water supply line from the base of the valve. Place a towel or bucket underneath to catch any residual water.
• Tip: If your toilet has an older plastic water supply hose, this is a good time to upgrade it to a steel-braided hose. Steel hoses are more durable and resistant to bursting, which can help prevent unexpected leaks or flooding.
Step 4: Remove the Old Valve
Unscrew the old valve from the tank. Depending on the valve model, you may need to loosen clips or bolts to remove it.
Step 5: Install the New Valve
Place the new valve in the tank and follow the installation instructions provided with the part. Make sure to wrap plumber’s tape around the threads if needed to ensure a watertight seal.
Step 6: Reconnect the Water Supply Line
Attach the water supply line to the new valve, using your wrench to tighten it securely. Avoid over-tightening, as this could damage the valve or hose.
Step 7: Turn On the Water Supply and Check for Leaks
Turn the water supply back on by rotating the valve counterclockwise. Observe the area around the base of the tank and the supply line for any signs of leaks.
6. Troubleshooting Common Issues
Sometimes, issues can arise during or after installation. Here are some tips:
• Persistent Leaks: Ensure that all connections are tight and use plumber’s tape if necessary to seal threads.
• Unusual Noises: After installation, you may hear air in the pipes; flush a few times to eliminate this.
• Improper Fit: Verify that the valve matches your toilet type and model, especially if you’re replacing an older style valve.
7. Maintenance Tips for Toilet Water Valves
To ensure your new valve continues functioning smoothly, follow these maintenance tips:
• Regular checks: Every few months, inspect the valve area for signs of wear or leaks.
• Flush the tank: Occasionally flushing the tank helps prevent sediment buildup that can clog the valve.
• Replace plastic hoses: If your toilet still has an old plastic supply hose, consider replacing it with a durable steel-braided option.
Conclusion
Replacing a leaking toilet water valve is a straightforward process that doesn’t require expert plumbing skills. By following these steps and using quality parts, you can avoid water wastage and keep your toilet functioning efficiently. If you spot signs of a faulty valve or aging parts, such as the shutoff valve or plastic supply hose, tackle the problem proactively to ensure a smooth-running bathroom.
FAQs:
Can I replace a toilet valve myself?
Yes! Replacing a toilet valve is a relatively straightforward DIY task that requires only a few tools and some basic guidance. Follow this step-by-step guide to handle it confidently.
Can you replace a flush valve without removing the tank?
You can replace a flush valve without removing the tank in most cases. Accessing the flush valve components directly from the top of the tank allows for repairs or replacements to be made without the need for tank removal. However, if you’re dealing with significant damage or corrosion, removing the tank may provide easier access.
How long does it take to replace a toilet fill valve?
Typically, the process takes about 30 minutes to an hour, depending on experience.
In this video, you’ll get a step-by-step guide on how to replace a toilet water fill valve. From turning off the water to installing the new valve, it’s all laid out to make it easy for you. So if your toilet is leaking or won’t stop running, follow along, grab some basic tools, and get your toilet back in top shape!
If you’re interested in tackling more DIY bathroom repairs, we’ve got you covered with other guides that are just as easy to follow. Check out our step-by-step articles on how to repair a leaking bathroom faucet and how to fix a leaking shower faucet. Both tutorials walk you through the tools, parts, and techniques needed to stop those pesky leaks and keep your fixtures in top shape. With a bit of patience and guidance, you can confidently tackle these plumbing issues yourself!
Ready to tackle your plumbing projects? Get the supplies you need with just one click!
Don’t wait—make your repairs easier today!
Here’s a little transparency: Our website contains affiliate links. This means if you click and make a purchase, we may receive a small commission. Don’t worry, there’s no extra cost to you. It’s a simple way you can support our mission to bring you quality content.